Creating and Editing Templates
Templates are PDFs with page settings, formatting, and other elements already in place that make it easier to create new documents of a particular type. Bluebeam Revu comes with several templates that are ready to use, or you can create your own. Templates can be created from any PDF file.
This document covers the process of creating and editing PDF templates in Revu . Creating PDFs based on existing templates is discussed in another document (see Creating a New PDF Based on a Template).
New templates are easily created in Revu using existing PDFs. The process varies slightly depending on whether or not the source PDF is open in Revu or not.
- Select the PDF's tab so that it is the active document in Revu .
- Go to File >New from Template >Save as Template. A Save As dialog box appears.
- Navigate to and select the folder you would like to save this template in. It is generally a good idea to keep related templates in the same folder as Revu will only list templates saved in one folder at a time when creating a template-based PDF.
- Rename the file if desired and click Save. Note: The file name is not necessarily the name that appears in the New list. Revu uses the document's Title (found in the Document Properties) instead. See Editing an Existing Template below for more information about changing the Title.
- Go to File >New from Template >Import Template. An Import Template Files dialog box appears.
- Imported templates are automatically saved in the active Template folder. If the one that is currently active is not the one you want to save this new template in (you can tell by reviewing the list of templates available in the list; they are all in the currently selected Template folder), select Change Template Folder, then navigate to and select the desired folder first.
- Navigate to and select the desired PDF.
- Rename the file if desired and click Open. Note: The file name is not necessarily the name that appears in the New list. Revu uses the document's Title (found in the Document Properties) instead. See Editing an Existing Template below for more information about changing the Title.
Templates exist as special files in Revu and should be edited in Revu .
To edit an existing template:
- Go to File >New from Template and click the
 Edit button that appears to the right of the desired template when you hover your mouse over that area.
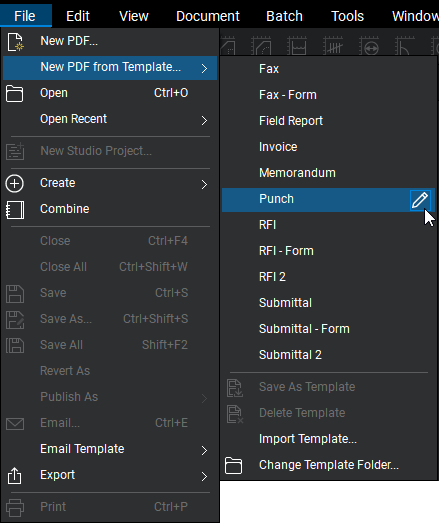
- Only templates from the active Template folder are listed. If the desired template is not shown, select Change Template Folder, then navigate to and select the folder it's in.
- When the Template opens, it will have an icon on its tab that lets you know that it's a Template and not another document.

- Add any fields or markups that you want to be not editable on PDFs using this template (for example, logos, field labels and the like) using the Markup tools.
- Once you have finished editing the Template, go to Document >
 Flatten. The Flatten Markups dialog box appears.
- Make sure All Markups is selected (it should be by default) and click Flatten.
- Add any fields you want to be editable on PDFs created using this template using the Markup tools. Do not flatten them.
- Templates can contain other PDF information besides markups, like Form Fields, Layers, and Spaces. A template can also contain multiple pages. See Template Editing Notes below.
- The name that appears in the New list is the document's Title found in its Document Properties. To change the Title, select
 Show Document Properties from the
  Document menu on the Properties Toolbar. Enter the desired name in the Title field and click OK.
- To save this Template under the same file name and in the same folder as the original, click
 Save.
Save.
- To save this Template under a new name and/or in a new folder, go to Save >Save As. A Save As dialog box appears. Navigate to and select a folder to save it in. Rename it if desired, then click Save.
Template Editing Notes
- When using Layers, there must be some PDF content or a markup on each layer for it to be included in the template.
- While Revu Standard and Revu CAD can create new PDFs from templates that contain Form Fields, Revu eXtreme is required to create form fields in the template.
To delete a template in Revu :
- Go to File >New from Template and click the Edit button that appears to the right of the desired template when you hover your mouse over that area.
- With the Template as the active file in Revu , go to File >New from Template >Delete Template. A confirmation dialog box will appear asking you to confirm that you wish to delete the template. Clicking Yes will delete the template.
